Posts
-
Flycheck 38: Might & Magic
Not all those who wander are lost.
– J.R.R. Tolkien
Today I’m happy to announce Flycheck 38 - easily the biggest and most ambitious Flycheck release since I took over the stewardship of the project. It’s the release where Flycheck grows a proper story for language servers, gets the kind of inline diagnostics you’d expect from a modern editor, and learns to apply fixes - all without giving up the checker model that made it popular in the first place.
The version number, I’ll admit, doesn’t do this one justice - it’s just the next integer after 37, and nothing about “38” whispers “special”. But that’s how it goes with version numbers: some releases are more special than others, and you’d rarely guess which from the number alone.
Read More -
CIDER and Projectile Meet Embark
Embark is one of those packages that quietly rewires how you use Emacs. Think of it as a context-aware right-click: you invoke
embark-act(I keep it onC-.) on whatever’s at point - a file name, a symbol, a URL - and Embark offers a menu of things you can do with it. The neat part is that it’s completely extensible, so you can teach it about new kinds of targets. Lately two of my projects, CIDER and Projectile, have grown Embark integrations, in slightly different ways, and both are worth a look.Let’s start with CIDER, and teach Embark about Clojure symbols, so
embark-acton one offers a bunch of CIDER commands: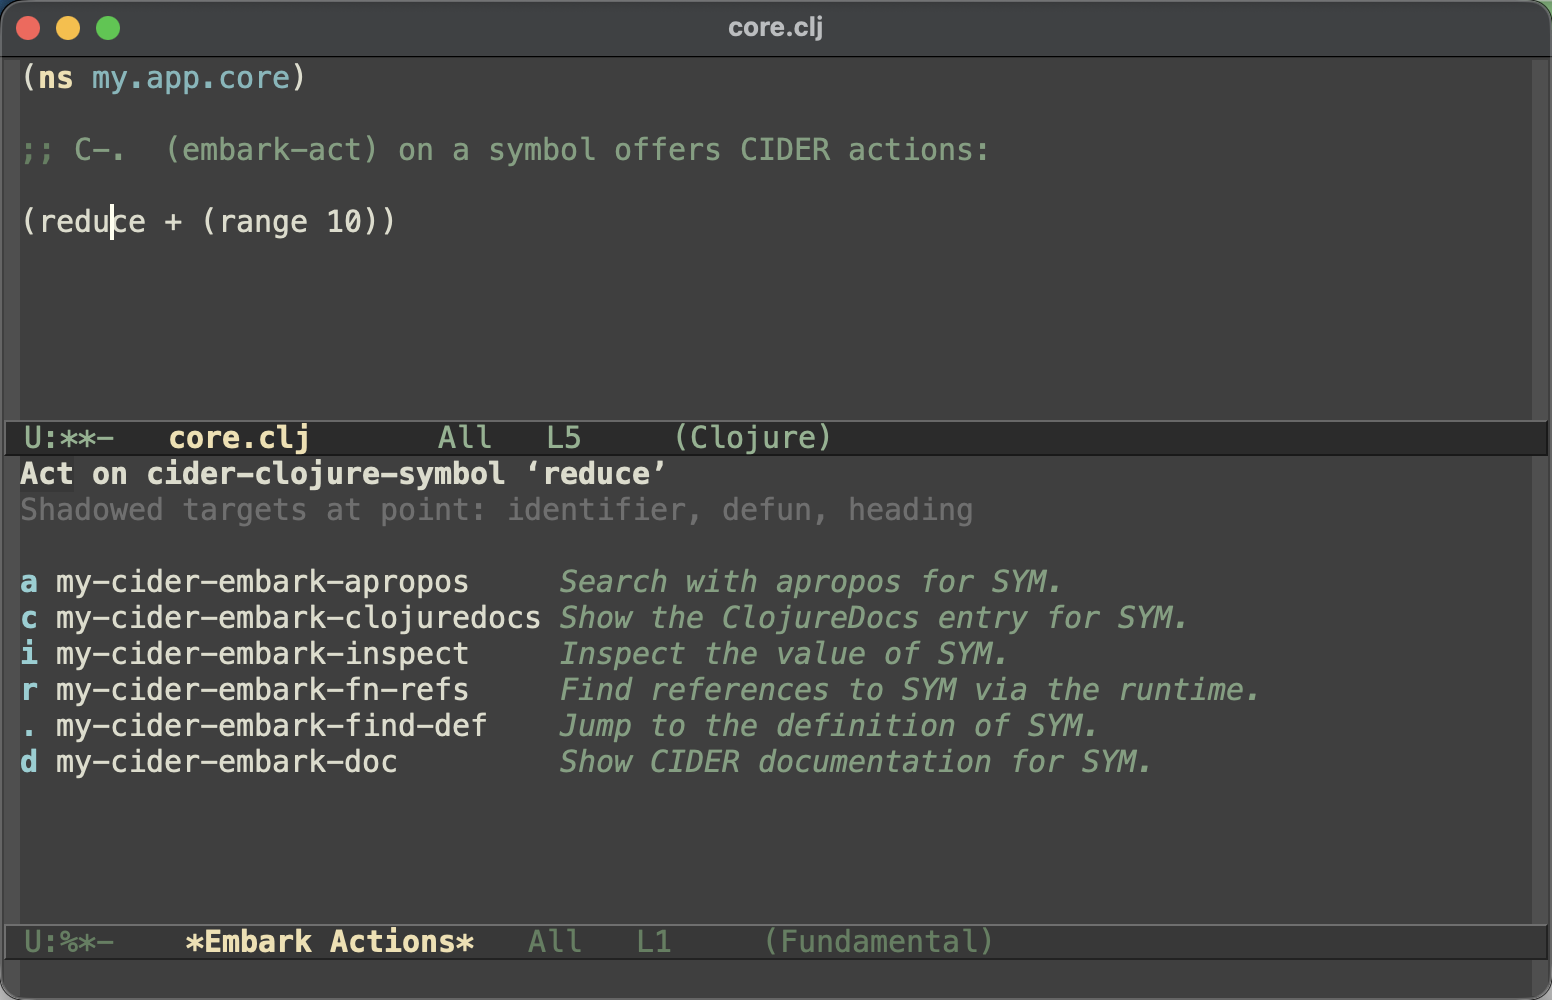
So
dshows the documentation,.jumps to the definition,rfinds references,iinspects the value,copens ClojureDocs andaruns apropos - the usual CIDER commands, a keystroke away from wherever your cursor happens to be.Here’s the setup. It’s a handful of little wrappers around the CIDER commands, a keymap that binds them, a target finder that spots a Clojure symbol at point, and the bit of wiring that ties it all together:
(defun my-cider-embark-doc (sym)
  (interactive "sClojure symbol: ")
  (cider-doc-lookup sym))

(defun my-cider-embark-find-def (sym)
  (interactive "sClojure symbol: ")
  (cider-find-var nil sym))

(defun my-cider-embark-fn-refs (sym)
  (interactive "sClojure symbol: ")
  (cider-xref-fn-refs nil sym))

(defun my-cider-embark-inspect (sym)
  (interactive "sClojure symbol: ")
  (cider-inspect-expr sym (cider-current-ns)))

(defun my-cider-embark-clojuredocs (sym)
  (interactive "sClojure symbol: ")
  (cider-clojuredocs-lookup sym))

(defun my-cider-embark-apropos (sym)
  (interactive "sClojure symbol: ")
  (cider-apropos sym))

(defvar my-cider-embark-symbol-map
  (let ((map (make-sparse-keymap)))
    (define-key map "d" #'my-cider-embark-doc)
    (define-key map "." #'my-cider-embark-find-def)
    (define-key map "r" #'my-cider-embark-fn-refs)
    (define-key map "i" #'my-cider-embark-inspect)
    (define-key map "c" #'my-cider-embark-clojuredocs)
    (define-key map "a" #'my-cider-embark-apropos)
    map))

(defun my-cider-embark-target ()
  (when (derived-mode-p 'clojure-mode 'clojurescript-mode 'clojurec-mode
                        'clojure-ts-mode 'cider-repl-mode)
    (when-let* ((bounds (bounds-of-thing-at-point 'symbol))
                (sym (cider-symbol-at-point)))
      (unless (string-empty-p sym)
        `(cider-clojure-symbol ,sym . ,bounds)))))

(with-eval-after-load 'embark
  (add-to-list 'embark-target-finders #'my-cider-embark-target)
  (add-to-list 'embark-keymap-alist '(cider-clojure-symbol my-cider-embark-symbol-map))
  (add-to-list 'embark-keymap-alist '(cider my-cider-embark-symbol-map)))
That last
ciderline is my favorite bit. CIDER’s symbol prompts (things likecider-docandcider-find-var) can read throughcompleting-readand tag their candidates with thecidercompletion category, so pointing that category at the same keymap meansembark-actworks on the candidates too. You start typing a symbol to read its docs, spot it in the candidate list, decide you’d rather jump to its definition -C-. .and you’re there, no retyping. Symbols in your code and candidates in the minibuffer end up sharing one set of actions.Projectile took the opposite tack and ships its Embark integration out of the box - there’s nothing to configure, it wires itself up as soon as Embark is loaded. Two things happen. Acting on a project candidate (say, in
projectile-switch-project) gives you project-specific actions - switch to it, open its VC interface, drop intodired, or remove it from the known-projects list - instead of the generic file actions you’d otherwise get: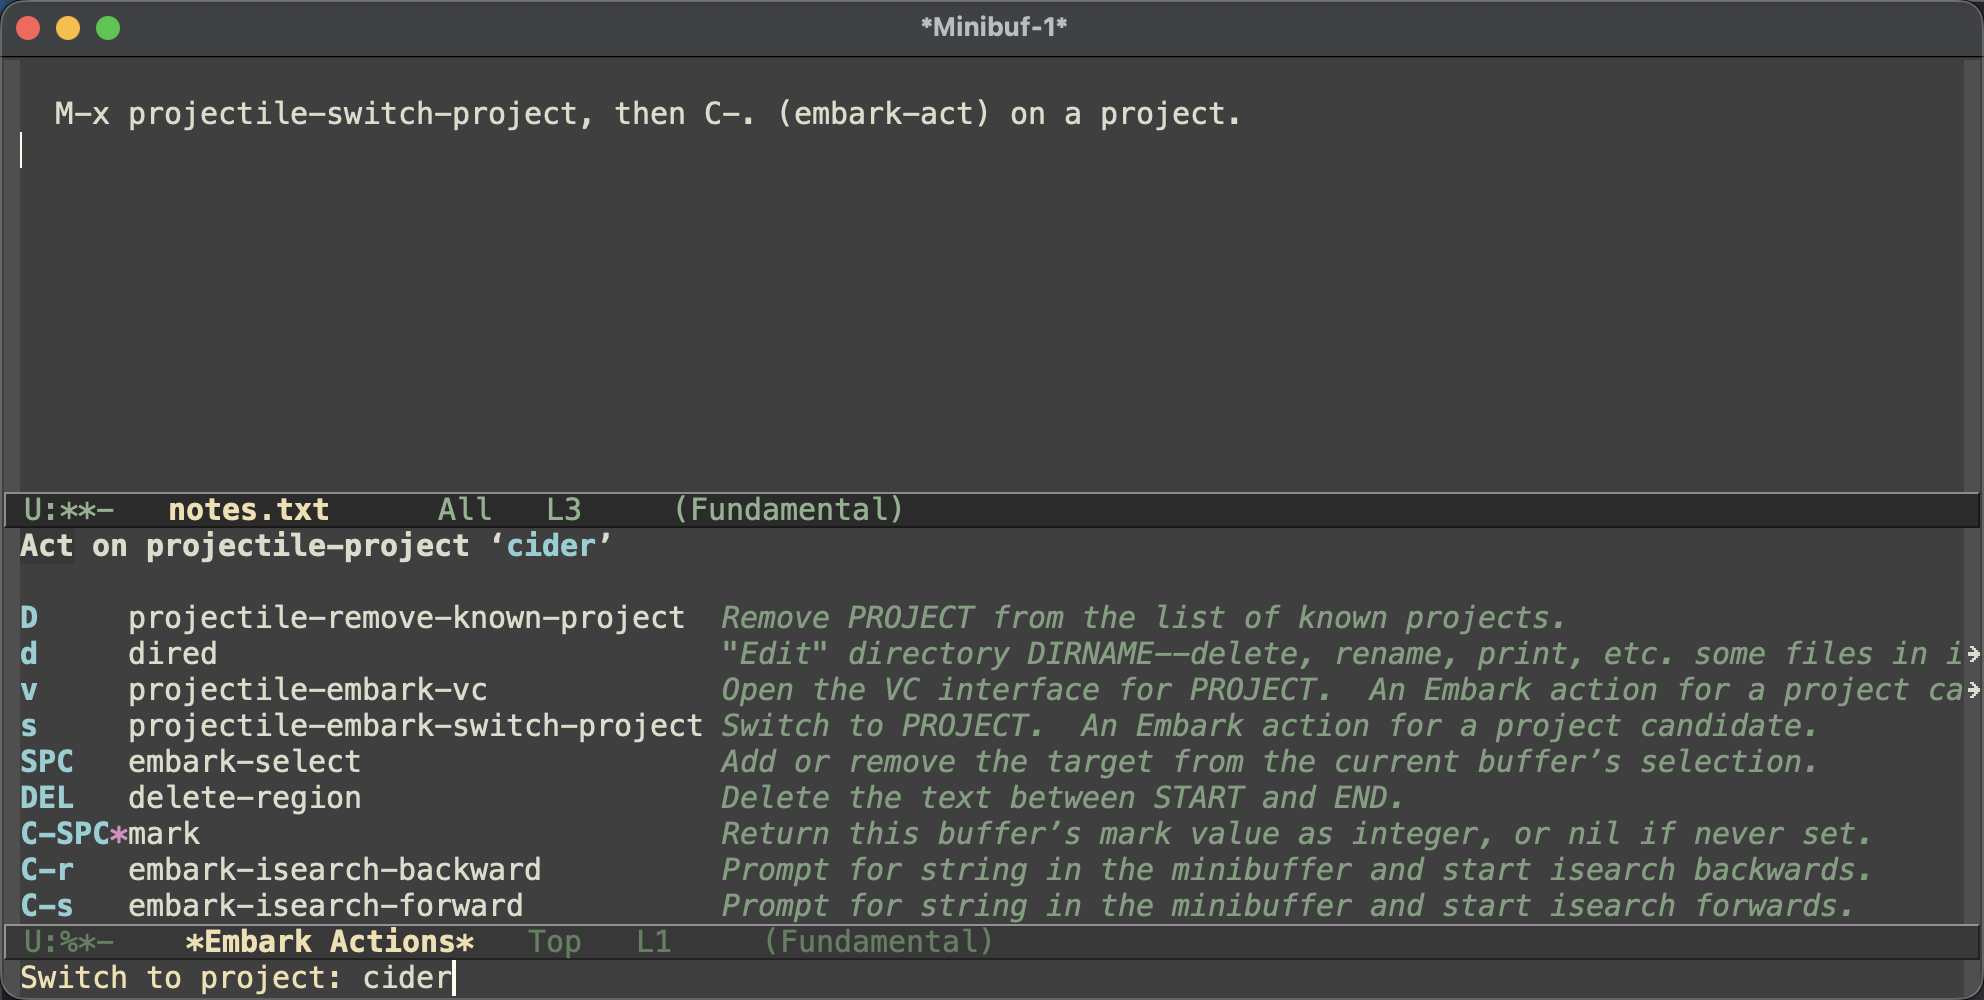
And when you act on a project file candidate, Projectile makes sure the path resolves against the project root, so Embark’s file actions land on the right file no matter what your
default-directoryhappens to be.You might wonder why Projectile ships this while CIDER leaves it to you. It comes down to what each integration is. Projectile’s is mostly about making the completion categories it already exposes behave correctly under Embark, plus a small and fairly obvious set of project actions - there isn’t much to bikeshed there. CIDER’s symbol actions are a bigger, more personal grab-bag: which commands you want on that menu, and which keys you put them on, is very much a matter of taste. A recipe you copy and tailor felt like the better fit. Same idea, two problems that wanted different answers.
That’s all I have for you today. Keep hacking!
P.S. If you’re not using Embark yet, the actions above are just the start - once you start thinking of
embark-actas “do something with the thing at point”, it’s hard to stop. -
Dedicate Windows with toggle-window-dedicated
You’ve carefully arranged your windows just the way you want them - source code on the left, tests on the right, maybe a shell at the bottom. Then you run some command that calls
display-buffer, and suddenly one of your carefully placed windows gets hijacked to show a*Help*buffer or a compilation log. We’ve all been there.The
Read Moredisplay-buffermachinery is one of Emacs’s most powerful features, but also one of its most frustrating. Emacs 30 adds a simple, practical tool to help tame it:toggle-window-dedicated. -
Right-aligned Mode Line Elements
Emacs users have long wanted the ability to push certain mode line elements to the right edge of the window. Think of it like having a left-aligned and right-aligned section in your mode line - buffer name on the left, maybe the time or some status info on the right.
Before Emacs 30, achieving this required various hacks involving padding calculations and propertized strings. It was doable, but fragile and ugly.
Emacs 30 makes it trivial with
Read Moremode-line-format-right-align. -
Flymake Can Now Show Diagnostics at the End of the Line
If you’ve used modern editors like VS Code, you’ve probably noticed how they display error and warning messages inline, right at the end of the offending line. It’s a nice touch - you don’t have to hover over a squiggly underline or check a separate diagnostics buffer to see what’s wrong.
Emacs 30 brings this capability to Flymake with the new
Read Moreflymake-show-diagnostics-at-end-of-lineoption.
Subscribe via RSS | View Older Posts